
Your first page
From a finished install to a page a visitor can see. No code, about ten minutes, and it works on the free build.
If you have not installed yet, start with Installation and come back.
What you are about to do
Four things, and the order matters:
| 1 | Install the starter block types — one button |
| 2 | Tell your MODX template where the page body goes — one line |
| 3 | Add blocks to a resource and fill them in |
| 4 | Publish |
A fresh install has an empty constructor on purpose: the component does not guess what your blocks should be. Step 1 is what saves you from writing a block type and a template before you have seen anything work.
1. Install the starter block types
PageBlocks → Constructor → Blocks → the Presets button.
Pick the starter preset, read the plan, install. The plan is not ceremony — a preset writes into the constructor tables, and you should see the list of changes before it happens rather than after.
You get seven types: Hero, Rich text, Cards, Gallery, FAQ, Call to action and Spacer. They were chosen to build a landing page in ten minutes, not to make the list look long. Their templates and styles come with the package, so they render on your theme without you writing any markup first.
The starter preset is free and ships with the ordinary package. Installing it twice is harmless: it looks things up by name and creates only what is missing.
These are types, not finished blocks
A preset installs schemas with fields — the thing you assemble a page from. It does not put any text or images on any page; that is step 3.
More: Block presets.
2. Tell your template where the body goes
This is the step people miss, and missing it looks exactly like a broken install: you add blocks, you save, and the page is empty.
Blocks are attached to the resource. Your MODX template decides where on the page they print. Open the template the resource uses and put this where the content belongs:
[[!pbBlocks]]Keep the !. Without it MODX caches the output, and your next edit in the builder will not show up until the cache is cleared — which reads as "saving does nothing".
That is the whole integration. pbBlocks renders each block through the chunk its type was configured with, in the order you arranged them.
More: pbBlocks.
3. Add blocks and fill them in
Open any resource. The PageBlocks tab is on the resource form.
Press add, pick Hero from the catalog, fill in the heading, the text, the image and the button. Add Cards under it and fill in a few rows. Drag blocks to reorder them.
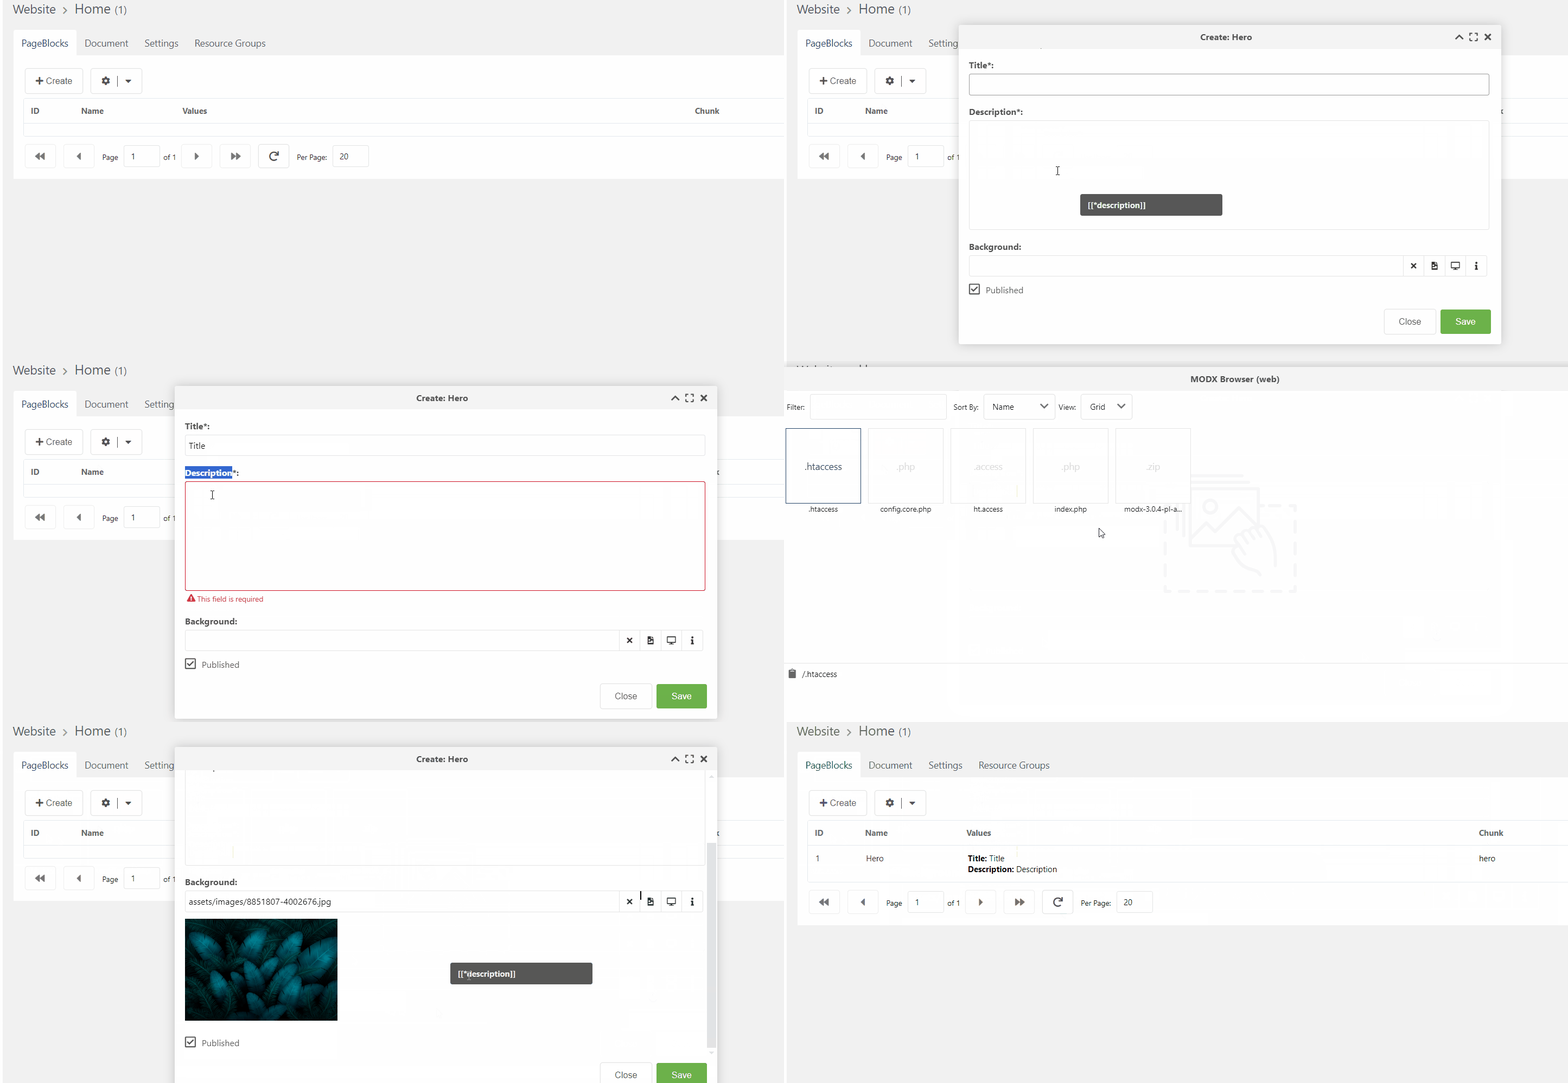
Nothing here is final: a block can be edited, copied, moved to another position or deleted and restored from the recycle bin afterwards.
4. Publish
A block has its own published state, separate from the resource's.
An unpublished block is skipped silently on the front end. No error, no gap, no entry in the log — it is simply not there. This is the first thing to check when a block "does not render", before you look at routes or templates.
Save the resource. Open the page. The blocks are on it.
Styles arrive on their own
The block layer — the content width, the vertical rhythm of sections and the CSS variables the starter blocks measure themselves by — is registered into the <head> for you by the OnWebPageInit event. On an ordinary MODX page you do nothing.
One exception. If you have turned pageblocks_routing on and a route of yours renders the page, that event never fires: the component answers the request and returns before MODX gets that far. Such a template needs one line in its <head>:
{pb_styles()}The whole layer sits in @layer pageblocks, so any unlayered rule in your theme beats it — you can override a single property without switching anything off. If you would rather carry the styles yourself, the system setting pageblocks_load_styles turns the layer off entirely.
Making the markup yours
The starter templates live in core/components/pageblocks/elements/blocks/. Editing them there works exactly until the next update overwrites them.
Instead, copy the file somewhere of your own and point the block type's chunk_path at it. The component's files stay untouched, your markup survives updates, and the two stop competing.
Inside a template, a field is a variable with the field's name:
<section class="hero" style="background-image:url({$background.url})">
    <div class="container">
        <h1>{$title}</h1>
        <p>{$description}</p>
    </div>
</section>title, description and background are what the Fields tab of the block type defines. File and image fields also carry url, width, height and title.
When a block does not show up
Check in this order — it is cheapest first, and the first two account for most cases:
| Check | Why it looks like something else |
|---|---|
| Is the block published? | An unpublished block is skipped without a word |
Is [[!pbBlocks]] in the template, with the !? | Cached output makes saving look broken |
| Does the chunk name match the file name? | A missing template returns an empty string and logs [Fenom]: Template … not found. The block is on the page, in the database, and nowhere on the site |
| Did you clear the MODX cache after installing? | A stale PHP or JS copy looks exactly like a broken install |
Where to go next
| Blocks | Define your own block type: fields, tabs, where it may be placed |
| Fields | All 39 field types, 30 of them free |
| Tables | Your own tables, filled in the manager — free |
| Quick start: snippets | Lists, menus, filters in a MODX template |
| For developers: routing | Routes, controllers and services, with no snippet involved |
| Free and PRO | Where the paid line runs |